Developing Methods of Estimating the Volume and Weight of Waste Piles through Balloon Mapping
Holden and I have been working with a community organization in Providence that is interested in estimating the weight and volume of waste piles produced by a construction and demolition facility. I figured if we can find estimate the height of the pile and it's area from a balloon map we should be able to estimate it's volume. Holden and I have been doing some research and here is what we have so far:
We're experimenting with adapting a method from surveying described here using a clinometer:
http://gabrielhemery.com/2011/05/15/how-to-calculate-tree-height-using-a-smartphone/
The idea is to estimate the height of the pile, and then use balloon maps to determine the pile's area, and then estimate it's volume.
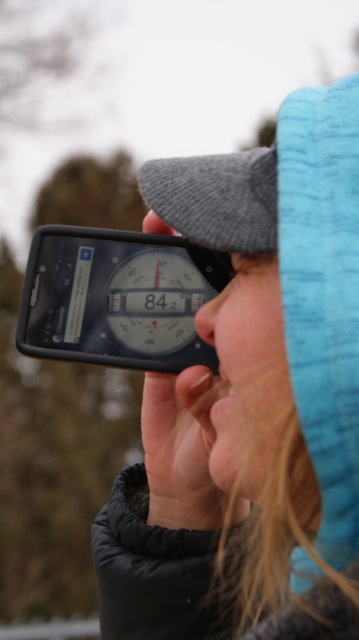
I downloaded these two clinometer apps:
https://play.google.com/store/apps/details?id=net.androgames.level&hl=en
https://play.google.com/store/apps/details?id=com.plaincode.clinometer&hl=en
Method for determining pile height:
"CALIBRATE – THE LEVEL … AND YOURSELF
Zero your virtual spirit level If you’ve installed a good spirit level app it should allow you to calibrate your smartphone to reasonable accuracy. On a shelf that you’ve checked to be perfectly level with a real spirit level, place your smartphone on its side , then ‘zero’ it (calibrate it to read ’0′). Calibrate your pacing You will need to be able measure the distance that you are standing away from a tree. You can of course carry a long tape measure with you when you think you’ll need one but I find it very helpful to know my pacing with reasonable accuracy. For example I know that 21 of my strides equal 20m. Measure the height above ground of your eye Simply measure the distance from the ground under your feet to one of your eyes. The data and the maths
THE DATA REQUIRED
You will need to know three things:
The angle of elevation to the top of the tree from the horizontal As shown below the horizontal will be equivalent to a line between your eye and someone of the same height standing next to the tree. The distance from where you stand to the base of the tree The height of your eye above the ground how to calculate tree height The three measurements needed to calculate the height of a tree
THE MATHS
Don’t be put off if you’re not confident about the maths as, although it may seem daunting, it’s actually quite simple. You will usetrigonometry but your smartphone’s calculator will do all the hard calculations for you.
The equation you will use is:
Tan angle of elevation x distance to tree
then
- height of eye above ground
Step by step guide (with working example)
- STAND AWAY FROM THE TREE
Stand away from the tree so that you can see its top. The method works best if your angle of elevation is about 45o . In other words that your distance from the tree is equivalent roughly to the height of the tree (you’ll get better at estimating this, the more trees you measure).
- PACE (OR MEASURE) THE DISTANCE AWAY FROM THE TREE
If you are working with someone else they can help you measure the distance from where you’re standing to the tree. If you’re on your own, drop something where you’re standing to mark the position so that you can return once you’ve paced or measured the distance to the tree.
I was 21m away from my tree. Write this distance down or memorise it.
- MEASURE THE ANGLE OF ELEVATION
measuring the angle of elevation with a smartphone measuring the angle of elevation with a smartphone = 43.7 degrees
Standing at your spot (step 2) open the virtual spirit level app on your smartphone and select the angle measure. Bring the smartphone to your eye and sight along its edge, as if you’re looking down a gunsight, aiming at the very top of the tree. You will need to hold the phone so that your fingers are not in the way (see photo).
With the app I use there is a ‘hold’ button that freezes it when you are satisfied that you are ready to record the angle.
My angle of elevation was 43.7o. Write this angle down or memorise it.
- CALCULATE TREE HEIGHT
Open the calculator on your smartphone. You will need to access the scientific calculator. For iPhones and HTCs you can do this by tilting your phone onto its side (landscape), where you will find the function for Tangent or Tan.
enter angle of elevation enter the angle of elevation (43.7)
tan of angle press tan (= 0.9556)
x distance to tree multiply this by the distance to the tree (x 21m)
add height to eye add height to eye (+ 1.73m)
result press equals (result = 21.79m tall)
So my tree was 21.798m tall. Given that there is lots of room for error I would recommend that you round the result to the nearest whole number = 22m tall. It doesn’t matter whether you use metres or feet as long as you use consistently the same units throughout (i.e. don’t switch between m and cm, or between feet and inches).
Increasing accuracy
The method I describe above works well on level ground. However, if you want to increase accuracy especially if the ground is not level, you can improve it quite simply. Instead of using the height of your eye above ground, you substitute it with (Tan angle to the base of the tree xdistance to tree). So the full equation would be:
(Tan ∠ to tree top x distance to tree) + (Tan ∠ to tree base x distance to tree)"
From
Gabriel H"
METHOD FOR DETERMINING AREA
We're experimenting with importing a Public Lab map in to Google Earth and using the Google Earth measurement tools to estimate the distances between the point of angle measure and the top of the pile, and the base area of the pile.
We're stuck at this point right now because we can't get the kml export from Mapknitter to work well in Google Earth. Could anyone help with this?
https://mapknitter.org/map/view/tla-pondview-12-14-13
NEXT STEPS
Once we have the height of the pile, we can take a few more measurement such as the top width, base width etc. and enter them into a stockpile calculator (http://www.arthon.com/calculators/stockpile.shtml). This will give us the volume of the pile, assuming we can get correct measurements from our images.
After we have the volume of the pile, the best source Holden can find for estimating weight of debris is FEMA, who has a brochure about debris containing volume/weight estimations. It's pretty informative, but the quick takeaway is that FEMA estimates:
Construction and Demolition Debris: 1 ton = 2 cubic yards
Mixed Debris: 1 ton = 4 cubic yards
Vegetative Debris: Hardwoods: 1 ton = 4 cubic yards Softwoods: 1 ton = 6 cubic yards
Questions and next steps
How can we exporting our map into Google Earth to use their measurement tools or are their measurement tools in MapKnitter we might make use of?
Why I'm interested
This method could potentially be useful for evaluating whether industrial facilities are operating within the bounds of their permits which often specify what tonnage a facility can produce or store.
4 Comments
Great work! While there are no specific measurement tools available for MapKnitter currently, the pixel/spatial resolution is available. Thus, scale can be used to do calculations in a separate image editing program that can do pixel line and area measurements.
Reply to this comment...
Log in to comment
Thanks! That is super helpful to hear, can you suggest what image editing program you would use? And how you might go about it?
Is this a question? Click here to post it to the Questions page.
Reply to this comment...
Log in to comment
For example: If you look to this MapKnitter landfill map it has a 10.75 cm/px spatial resolution. https://mapknitter.org/map/view/saugus-ash-landfill In this map a measurement 10 pixels in length takes up a little over 1 meter(107.5cm).
Next: With Photoshop(and likely many other tools) you could either trace new measurements as a new layer or simply use the measure tool to count pixels. The measure tool will interactively count as you make your selection. The process of actually counting the pixels could be done in many different ways. Perhaps it would work best using the magic wand/dynamic selection tool while playing with the tolerance to make proper area selections using the image characteristics.
Reply to this comment...
Log in to comment
The surface from motion (SFM) tools offer another approach to this application. Free ones like 123Catch (http://www.123dapp.com/catch), Hypr3D (now Cubify Capture)and others, or paid ones like PhotoScan standard edition ($179), or pay-by-the-drink cloud tools like Pix4D and Dronemapper, can generate a 3D model of the scene from your BAP/KAP images (some need geotagged images, some don't). Other tools like meshlab allow one to export and view, manipulate, scale and measure areas and volumes.
Reply to this comment...
Log in to comment
Login to comment.