Oil Testing Kit
Introduction
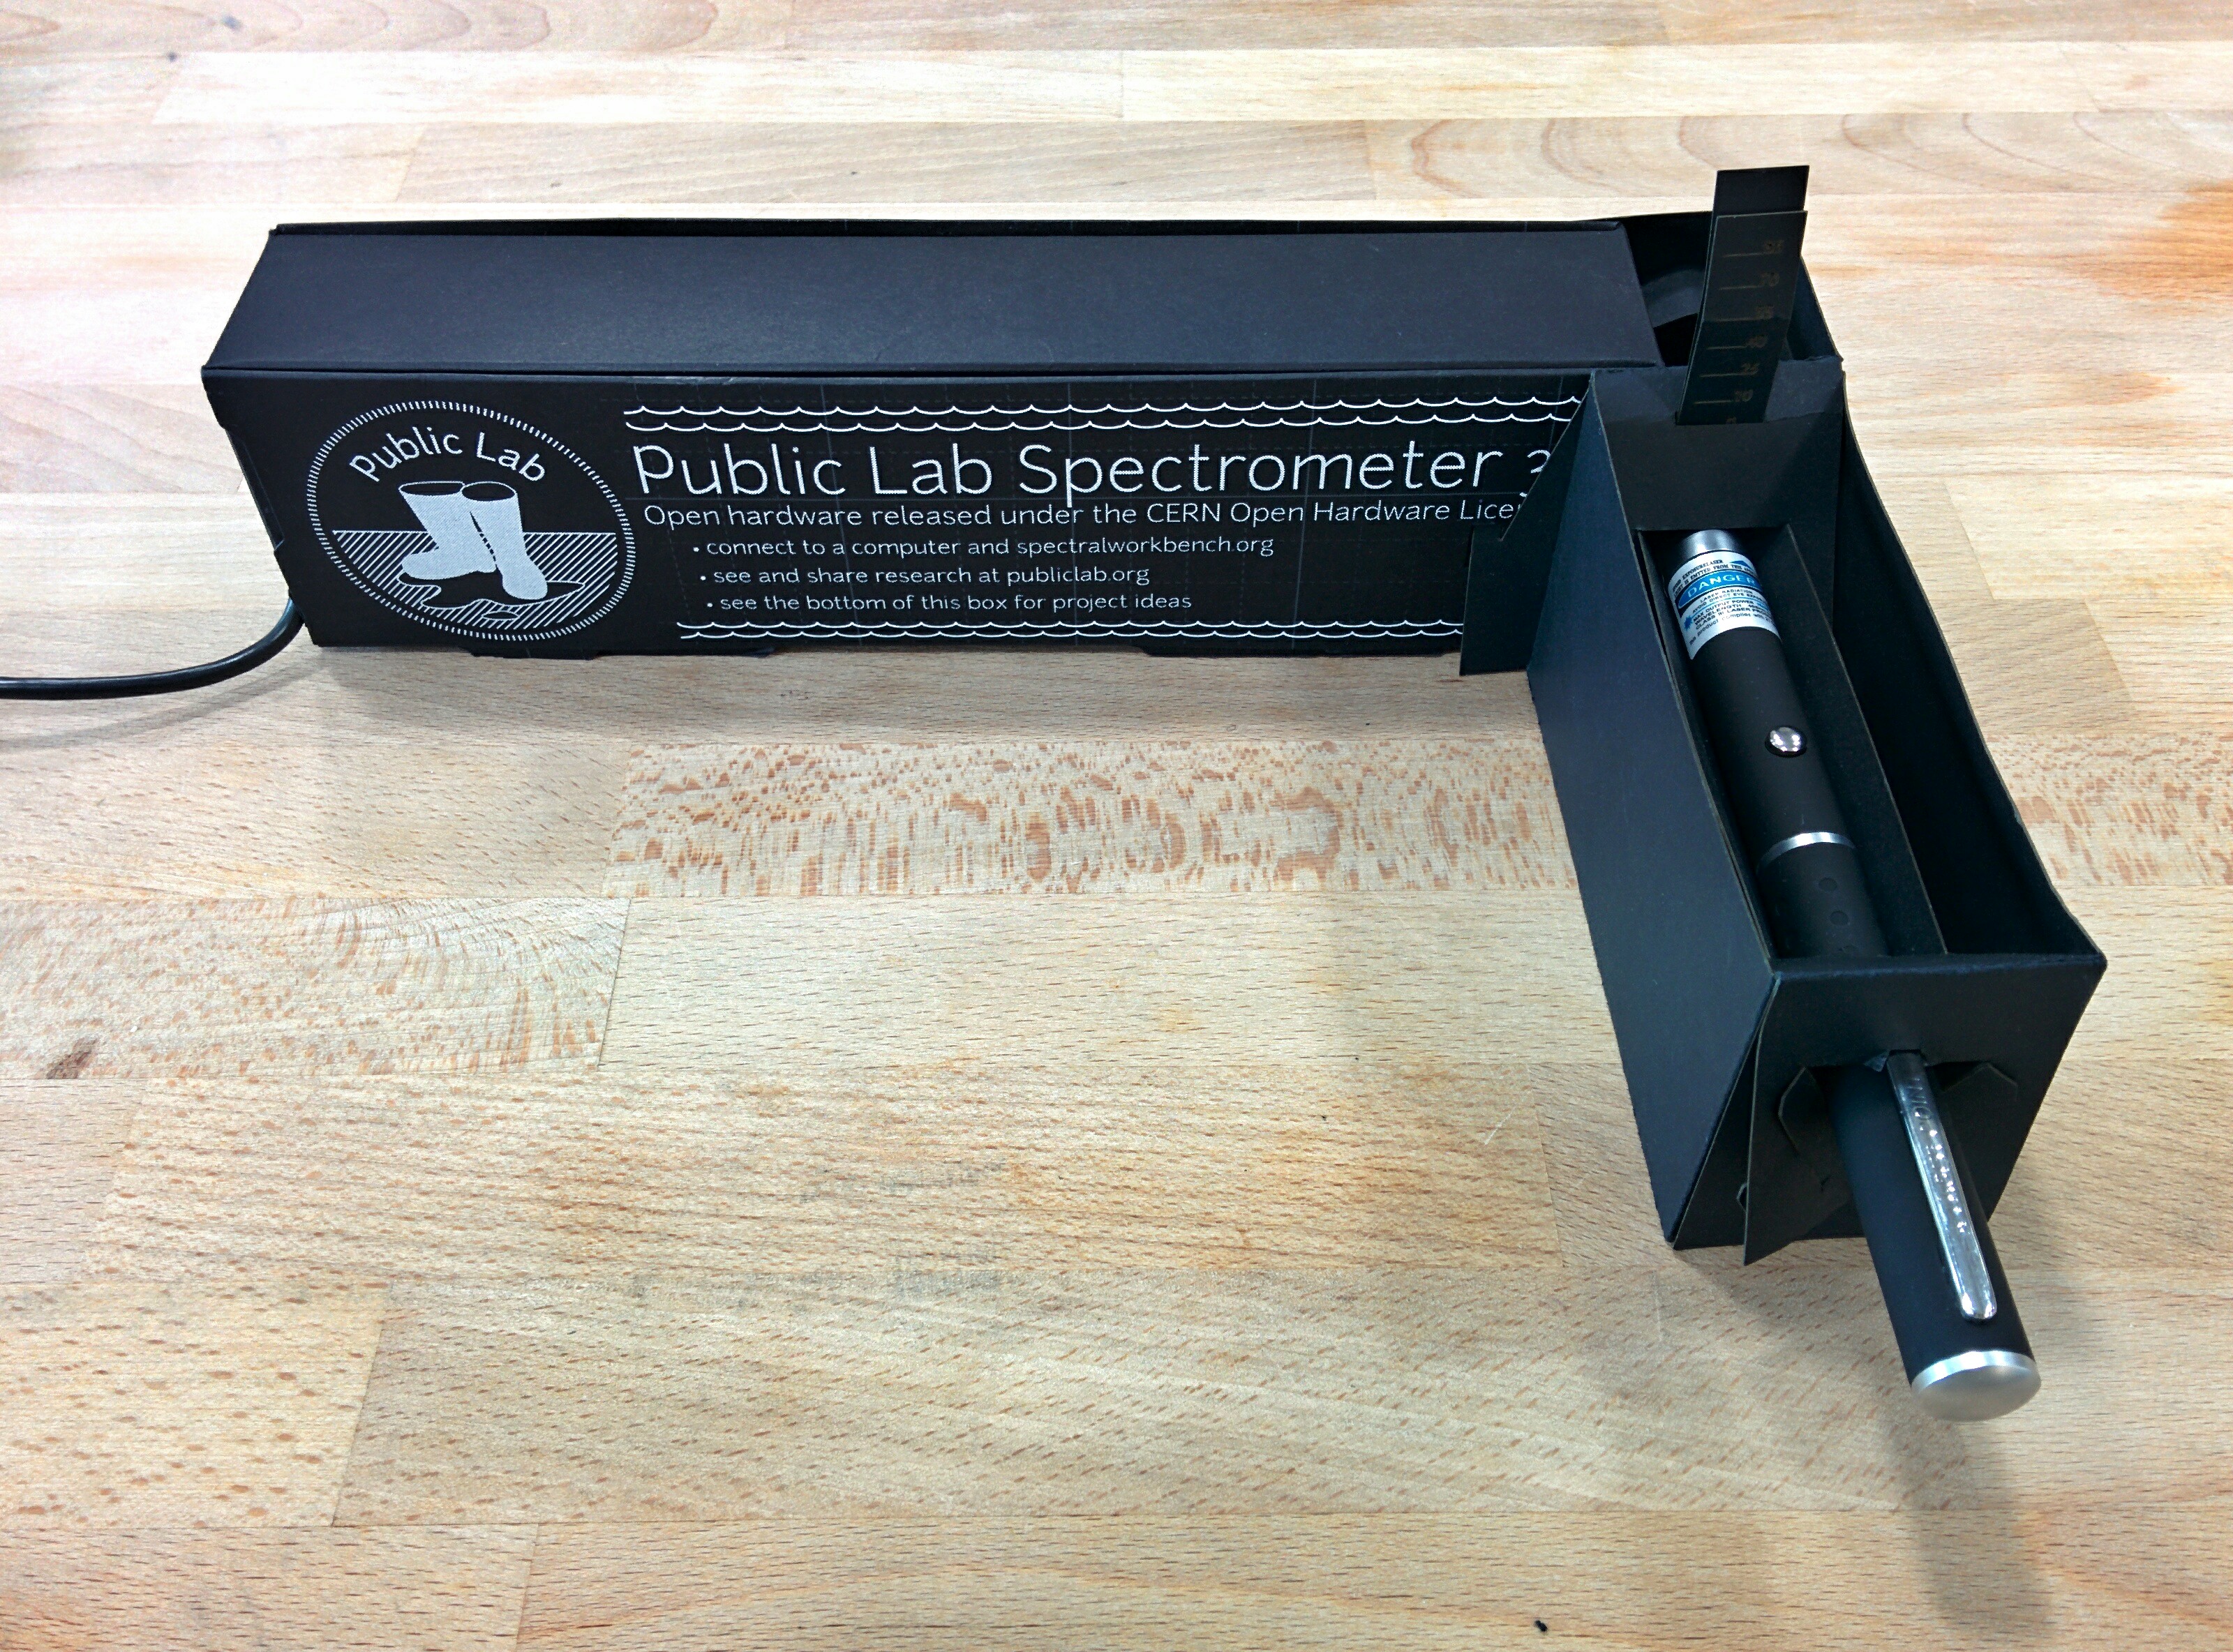
The Oil Testing Kit is an open source Do-It-Yourself kit which attempts to make it possible to identify oil pollution by type. This means matching a suspected sample with a known sample of crude oil, motor oil, heating oil, or other petroleum-based contaminant using a homemade fluorescence spectrometer. A spectrometer enables you to precisely measure the colors of light emitted by carefully prepared samples when they are illuminated with strong ultraviolet light, as shown above.
Collect, Scan, Compare
The process of testing for oils can be described in three overall steps;
- collecting samples of suspected oil or tar from the ground, and dissolving small amounts in mineral oil so they are transparent
- illuminating the solutions with ultraviolet light -- presently using a 405 nanometer blue laser -- and recording the light spectrum with a DIY spectrometer
- comparing the spectrum to those of similarly prepared samples of known pollutant oils, as well as a negative control
Here we will discuss and illustrate these steps in depth -- but keep in mind this process is always evolving. See the Challenges section for ways to get involved and contribute.
Collect
Locating samples
Originally, we focused on tar balls which were washing up on US Gulf Coast shorelines following the BP oil spill. These ranged from hard black lumps to orange residue. But oil contamination takes many forms, from residue around a street drain, to a sheen or buildup on the surface of the water. Here are some examples:


Left to right: dried oil on rocks in 2010, Louisiana coast by Cesar Harada CC-BY-NC-SA, oil residue in the ocean in 2010, Louisiana coast by Cesar Harada CC-BY-NC-SA, Oil tanker leak on tracks beside Mississippi River, by @marlokeno, swabbing a street grate by @warren
Preparing samples
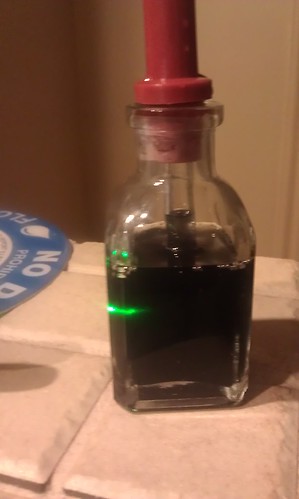
Use a cotton swab or small brush, dipped in mineral oil, to break up some of the material and dissolve it in a small, square-sided glass jar of mineral or baby oil. Wear gloves before handling suspected pollutants. You may need to rub the sample for a while to get it to dissolve. If it does not dissolve, there may be more aggressive ways to dissolve it. Where possible, try not to put too much sand or other stuff in the jar. It's a good idea to keep extra samples (dry, as you found them, not in mineral oil) in glass jars, stored in a cool dark place, as there may be an opportunity to test them later with more expensive, official means (see Validate your results below).

Seal the bottle tightly with the cap. You can then gently turn it over a few times to get the residue to dissolve -- it may take some time before the mineral oil takes on a distinct but faint yellowish hue. You may then have to wait for the sediment to settle out. You want the liquid to be quite transparent, with the chunky stuff settled to the bottom.
Concentration
One big issue is getting the correct concentration of sample dissolved. If it's too little, we may not be able to get it to glow under UV light. Too much and it could be too dark for the light to be visible in the bottle. Ideally we'd like to have the same concentration in each sample bottle, but determining this is very difficult as the samples may be mixed, so they can't easily be weighed. We recommend going by how dark they are -- try for a color similar to very dilute tea:

This sample by @eustatic is too dark for the laser to get through:
https://farm4.staticflickr.com/3725/9711572372_3aa638cf46.jpg
Labeling
Label the bottle with the date, time, and location. If you also give it a unique number, any other information can be kept in a notebook next to that number, such as further notes on the location and its condition. Take a photo of the sample with your label, in the place you found the sample, for context.
[image of bottle with id label next to notebook with extra details]
Scan
Now that your sample is prepared, you may be able to get it to fluoresce or glow by shining an ultraviolet light through it. We have had good results using a blue/UV laser, a 405 nanometer laser which is the same as found in a Blu-Ray player. See the parts list below for where to buy one. Strong UV LEDs can also work, but are not as bright. They are, however, easier to line up with a spectrometer's opening slit.

Note that the laser will have a purple-ish color by itself (as seen in the lead image at the top of the page) -- this is not fluorescence, but just scattering of the laser light. What you're looking for is any other color -- whitish, bluish, greenish -- which is not from the laser, but is produced in the material itself as it's excited by the UV light.
To measure precisely the colors that are being produced, we will use a spectrometer.
Spectrometry
Colored light is often a blend of different colors. A spectrometer is a device which splits those colors apart, like a prism, and measures the strength of each color. A typical output of a spectrometer looks like this;
[illustration of spectrometer plot]
While there are many ways to use a spectrometer, in this case we can clearly see the laser color, or wavelength, which is only in a narrow range around 405 nanometers, to the left:
[image here]
All the remaining light, to the right of that tall peak, is produced by the excited material in the sample. The shape of that curve can be matched against other samples to help us identify what ours is.
Construct a spectrometer
- different kits, download
- still under development
Illuminate the sample
- cover it! no room or daylight
- good exposure
- no clipping
Refine your technique
- same concentration
- take several for each, label them
- smooth your data
- repeat twice through and ensure your same samples are similar (ref. parts & crafts sample)
- concentration is OK?
Compare
When identifying an oil, we are hoping to measure the color of fluorescence of the Poly-Aromatic Hydrocarbons (PAHs) in the sample. The best way to identify a sample would be to compare it to a selection of similarly-prepared known reference materials. For example, if you have unknown X, you could compare it to both: A) a known sample of crude oil and B) a known uncontaminated sample of material (perhaps soil) to see which it matches best.

Which is it more like? Ideally, it should be compared to a range of possible references. For example, if it's possible the sample is heating oil or motor oil, you could compare it to similarly prepared samples of those as well. Some research has shown that vitamins A and E can produce fluorescence similar to petroleum products.


Plot your samples
Add all your scans to a set, so they can be viewed together. Your spectrometer should be calibrated and the very tall peaks from the laser light should align if this has been done correctly.
Positive and negative controls
Think critically about your testing. How could it have gone wrong? Could you have made mistakes, or is the match you've found between your unknown sample and your references not good enough? Could another material produce the same color spectrum as your suspected contaminant, and fool your test? (See this research on Vitamins E and A causing such false positives).
Validate your results
An extra step that may give your work more credibility is to submit a few of your samples for analysis to a lab, or to use other tests to confirm your results. Alternatively, if you know other testing has occurred, you can try to extend its results by re-testing the same site or samples, correlating your results with the previous test, and performing your own tests over a larger area or on more sites, or over a longer time span.
Publish
Ask others to critique your work or help you refine it on the plots-spectroscopy discussion list or by posting a research note thoroughly describing your results. Even if your work is not done, it's a great idea to share and solicit feedback on your plan before, during, and after you've done the work. You may be able to build on previous work on the website, and your work will help others who are seeking to perform similar tests.
Dissolving samples
We use mineral oil as it's non-toxic and cheap, and can be purchased in most pharmacies as either mineral oil or "baby oil". However, some samples may be hard enough that they don't dissolve readily, and more aggressive solvents may be able to dissolve these, such as methanol or denatured alcohol. These are not as safe to handle, however, so we advise caution if you attempt this. Please post a research note if you attempt this, as it is an unexplored area.
Challenges
This document, and this methodology, is still under active development. What you see on this page is only the best attempt so far at collating and presenting the work of Public Lab contributors to date. Some of the challenges that remain include:
- developing a better, simpler method for getting consistent concentrations of sample dissolved
- determining if equalizing the area under the curve (in software) for different samples may make consistent concentration less important -- can matching still succeed?
- developing a quick-to-assemble but precise and durable and cheap version of Public Lab's DIY spectrometer for scanning samples
- scanning known samples of oil for use in comparisons
- determining if it's necessary to scan references (and have crude samples) when testing, or if we can rely on previously scanned references -- are scans consistent enough or do we have to mail crude around?
- exposure: how do we ensure enough light from the sample enters the spectrometer, and (when using a laser) that aligning the light with the slit is easy?
Be sure to share your research as you tackle these questions -- publish early and often! Remember that every additional step can add complexity and cost to the process, so always keep in mind what such steps achieve, and balance that against the potential barrier to entry they cause.
Variations
There are many variations of the process which could be useful but are not essential. These include:
- collecting samples from a sheen on the surface of the water -- which may be difficult as sheens are extremely thin and spread out
- measuring fluorescence in-situ on the ground, without collecting or concentrating samples in a jar -- which could be difficult as it's very dilute and mixed with other things like water, dirt, or plant matter
Many of these may be future goals of the project, but we are focusing on our primary use case of collecting contaminated soil or residue from the ground, dissolving it in mineral oil, and illuminating it with UV in a spectrometer.
Alpha program
We've sent out about 20 prototype "alpha" kits to people around the US to give the oil test kit a try, and refine it to get ready for a bigger release. If you have one please share what you've done with it and post any ideas, feedback, complaints, suggestions, questions and modifications you have by using this button:
Post about your alpha oil testing kit
Literature review
Giger, Walter, and Max Blumer. "Polycyclic aromatic hydrocarbons in the environment. Isolation and characterization by chromatography, visible, ultraviolet, and mass spectrometry." Analytical chemistry 46.12 (1974): 1663-1671. http://pubs.acs.org/doi/abs/10.1021/ac60348a036
Pharr, Daniel Y., J. Keith McKenzie, and Aaron B. Hickman. "Fingerprinting petroleum contamination using synchronous scanning fluorescence spectroscopy." Groundwater 30.4 (1992): 484-489. http://onlinelibrary.wiley.com/doi/10.1111/j.1745-6584.1992.tb01523.x/abstract
Ryder, Alan G. "Analysis of crude petroleum oils using fluorescence spectroscopy." Reviews in Fluorescence 2005. Springer US, 2005. 169-198. http://link.springer.com/chapter/10.1007%2F0-387-23690-2_8
Parts list
In progress: these are links to where you can buy parts to assemble your own oil testing kit
Possible upgrade: nail polish bottles, with built-in bottlecap-swabs. An all-in-one, one-use pre-filled with mineral oil! Maybe you break off the swab and throw it away, or maybe it doesn't matter.
http://www.ebottles.com/showbottles-bottle-1556-kw-ELIQUID_VIALS.htm
- http://www.ebottles.com/showbottles-bottle-1329-gclid-Cj0KEQjwopOeBRC1ndXgnuvx8JYBEiQAq4RPt_MBIoRstpRXJzK66iXV1lbaZ6J7TWOot8oR6wDas7QaAops8P8HAQ-kw-NAIL_POLISH_BOTTLES_WITH_BRUSHES___GLASS.htm
- http://www.freundcontainer.com/french-square-glass-bottles/p/v4225B01/
- 5oz mineral oil (baby oil -- the added fragrance doesn't fluoresce): $3 - http://www.amazon.com/Johnson-Baby-Oil-Kids-Ounce/dp/B000GCJM06/
- an eyedropper: $0.05 0 http://www.sciplus.com/p/CAP-WDROPPER_39038
- a 405nm blue/violet laser pen: $3 http://www.alibaba.com/product-gs/700677050/well_tested_405_nm_blue_laser.html, or http://www.ebay.com/itm/like/350812684726?lpid=82 to buy just one cuvettes
- 4 flat-sided jars: $0.35 each - http://www.sciplus.com/p/WHITCAP-BOTTLE_48212
- cotton swabs: $0.10
- olive oil test sample: $0.17
- paper instructions (yet to be made)